Preparing the Surface
1. Fasten the roofing felt or waterproof backing to the sheathing or other surface with galvanized nails. Each horizontal strip of backing should overlap the one below it by 3".
2. Install the metal stop beads at the bottom and top of the walls and around all doors and windows. Cut the beads to size using a metal snip or hacksaw. Nail the beads to the concrete foundation or the edge of the wood sheathing. Be sure the beads are installed level and that sections are properly aligned.
3. Attach the lath, working from the bottom up. Rest the first sheet of lath or mesh in the stop bead that runs along the base of the wall. Fasten the lath or mesh with self-furring nails as just described.
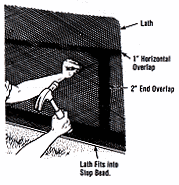
4. Continue to install lath sheets. Successive sheets should overlap the one below it by 1". The metal lath should extend ¾" beyond the corner beads at any outside corners.
Control Joints
Undesirable cracking can be minimized by careful preparation and application of the stucco coats. By even with the finest job, cracks can develop due to many factors, including:
- Shrinkage stress
- Building movements
- Settling foundations
- Construction joints
- Intersecting walls or ceilings, corners, and pilasters
- Restraints from lighting and plumbing fixtures
- Weak sections due to cross-section changes, such as openings
While it is difficult to prevent all cracks, they can be largely controlled with the help of metal contraol joints. These stucco control joints should be installed directly over existing control joints in the underlying structure.
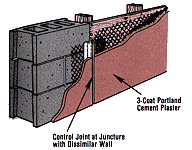
Walls and ceilings that use metal lath to anchor the stucco should be divided into rectangular panels with a control joint at least every 20'. The metal lath should not extend across these control joints. Use metal that is weathertight and corrosion resistant for control joints on exterior surfaces.
Applying the Scratch Coat
1. Both the scratch or first coat and the brown or second coat are made suing QUIKWALL® Base-Coat Stucco Mix. Add enough water to the mix to achieve a putty-like consistency, and prepare only enough mix that can be applied in about 1 hour.
2. Trowel the scratch coat onto the lath or mesh working from top to bottom. The scratch coat should be 3/8" thick. Force it through the wire mesh so that it fills the ¼" gap between the mesh and wall completely,
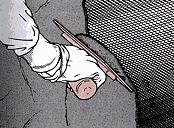
3. Smooth the scratch coat with the trowel.
4. After the scratch coat has set enough to be firm but not hard, use the rake to scratch horizontal grooves about 1/8" deep across the face of the base coat mortar.
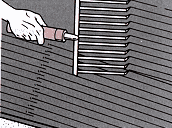
5. Mist the scratch coat periodically to ensure strong curing. When applying stucco over open-frame wood construction, wait at least 48 hours before applying the brown coat.
Applying the Brown Coat
The brown coat is the second coat of stucco. It too consists of QUIKWALL® Base-Coat Stucco Mix. The brown coat is applied to a thickness of 3/8". Take extreme care to apply the brown coat smooth and evenly. The finish coat is only 1/8" thick and will not hide bumps or irregularities in the brown coat surface.
1. Prepare only as much QUIKWALL® Base-Coat Stucco that can be applied in 1 hour.
2. Dampen the surface of the scratch coat with a fine spray of water, but do not soak it.
3. Use a trowel to apply the brown coat to a 3/8" thickness. Do the entire wall section in one work session, otherwise a color difference might be seen through the finish coat.
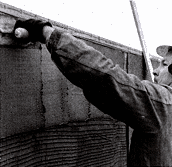
4. Screed the brown coat evenly by running the edge of a straight board over the brown coat and smoothing out the high and low spots.
5. After the brown coat loses its sheen, float it smooth.
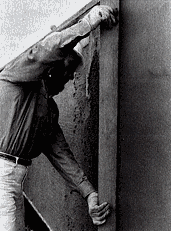
6. Moist-cure the brown coat for 2 days, and then air cure for 5 additional days before applying the finish coat.
Applying the Finish Coat
The finish coat is the third or top layer. It consists of QUIKRETE® Finish-Coat Stucco applied to a 1/8" thickness.
1. Trowel the 1/8" thick finish coat over the brown coat, starting at the bottom and working to the top of the wall. As with the brown coat, mix only enough stucco that can be applied in 1 hour and complete the entire wall or major section in one session to reduce possible color variations.
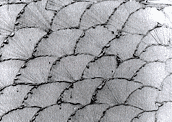
2. QUIKRETE® Finish-Coat Stucco readily accepts any number of popular textured finishes. Depending on the desired texture and finish, the coat can be applied evenly or unevenly. You can give an even texture distinctive finishes by lining it using a broom, slapping it with a leafy branch or the mason't brush, or by flinging small gobs onto it and floating them almost flush with the smooth layer. Several finishes are shown here.
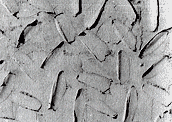 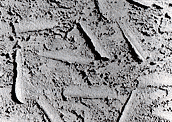
3. Moist-cure the finish coat for 5 days by misting it periodically with a fine spray.
4. Seal all the joints around doors and windows with a masonry-compatible caulk.
5. QUIKRETE® Finish-Coat Stucco can be colored prior to application, eliminating the need for painting. Simply add liquid QUIKRETE® Stucco and Mortar Color directly to the mixing water before it is added to the dry QUIKRETE® Finish-Coat Stucco mix.
Two-Coat Stuccoing
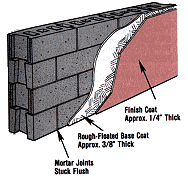 Two-coat stuccoing is often used when stucco is applied directly to concrete or masonry surfaces without the use of lath or wire mesh. This is because the masonry or concrete provides a very rigid stable base. In a two-coat application, the brown coat is eliminated and the finish coat is applied directly to the scratch coat. As shown in the illustration, the scratch coat of QUIKRETE® Base-Coat Stucco is applied to a 3/8" thickness, grooved, and cured as in a three-coat system. The top coat of QUIKRETE® Finish-Coat Stucco is then applied to a ¼" thickness and textured as desired. Two-coat stuccoing is often used when stucco is applied directly to concrete or masonry surfaces without the use of lath or wire mesh. This is because the masonry or concrete provides a very rigid stable base. In a two-coat application, the brown coat is eliminated and the finish coat is applied directly to the scratch coat. As shown in the illustration, the scratch coat of QUIKRETE® Base-Coat Stucco is applied to a 3/8" thickness, grooved, and cured as in a three-coat system. The top coat of QUIKRETE® Finish-Coat Stucco is then applied to a ¼" thickness and textured as desired.
| Required Tools & Materials |
- QUIKRETE® Base-Coat Stucco
- QUIKRETE® Finish-Coat Stucco
- Mixing box
- Mason's Hoe
- Hawk
- Trowel
- Float
- Plaster
- Rake
- Masonry brush
- Screed Board
- QUIKRETE® Concrete Acrylic Fortifier
- Caulking gun and caulk
Surface Preparation
Concrete or masonry surfaces must be sufficiently rough and porous to provide proper adhesion for the base coat in a two-coat system. You can estimate the surface porosity by spraying it with clean water. Notw how quickly the moisture is absorbed. Porous, strong bonding surfaces such as concrete or cinderbased block will usually absorb water readily.
Troweled concrete walls may be too dense to absorb sufficient water. This is the case if water droplets form from the spray and run down the wall surface.
The addition of ½ gallon of QUIKRETE® Concrete Acrylic Fortifier as part of the mix water for each 80-poung bag of QUIKRETE® Finish-Coat Stucco Mix used to form the scratch coat layer will provide sufficient holding power on slightly rough surfaces.
Concrete and masonry surfaces should be free of oild dirt or other materials that could weaken the bond. Paint must be removed from painted concrete or masonry to improve the bonding characteristics of the scratch coat.
Application
1. Locate and construct control joints as in three-coat stucco systems described earlier in this section.
2. Application of the 3/8" thick scratch coat and ¼" finish coat is similar to three-coat procedures described earlier. Make certain to cure the scratch coat for at least 24 hours before applying the finish coat.
One-Coat Stuccoing
QUIKWALL® Fiber-Reinforced Stucco (FRS) is an alkali-resistant glass fiber-reinforced stucco intended to be used as a one-coat stucco over exterior rigid insulation board or non-insulated exterior-approved sheathing, such as Type-X gypsum board. The one-coat QUIKWALL® FRS is applied to a minimum thickness of 3/8" and can be textured as desired. It provides a high-impact, crack-resistant shell.
Sheathing and Rigid Insulation
In non-insulated installations, the thickness and type of sheathing must match all local and national building codes governing your area, so check with local building authorities during the planning stages of the project.
In insulated installations, the expanded polystyrene board must meet the AFM manufacturing specifications for AFMWSGEPS, ICBO Evaluation Report No. 4169. Your building supplier should be able to confirm this for you when you purchase the insulation.
Insulation panels should be tongue-and-groove design with a minimum tongue height of 3/8", unless local codes specify differently. Install the panels in a horizontal position with the tongues facing upward. All panel edges must butt on underlying stud, and vertical butt joints should be staggered when they occur other than at corners or against metal trim. The insulation board can be installed over a waterproof membrane according to local codes.
Surface Preparation
Surface preparation for one-coat QUIKWALL® FRS stuccoing over approved sheathing or insulation panels is similar to that used in standard three-coat stuccoing covered earlier.
The QUIKWALL® FRS is applied to a minimum thickness of 3/8" over a base consisting of a waterproof backing paper covered by 1" by 20-gauge galvanized wire mesh. The mesh may be either self-furred or furred using self-furring nails as in the three-coat system discussed earlier. As with three-coat systems, the ¼" space between the backing paper and the mesh is critical for the project's success. Metal capping is also installed at the top and bottom of the wall and along windows and doors. Control joints must also be installed as in three-coat systems.
| Required Tools & Materials |
- QUIKWALL® Fiberglass-Reinforced Stucco
- QUIKRETE® Concrete Acrylic Fortifier
- Mixing box
- Mason's hoe
- Hawk
- Trowel
- Masonry brush
- Hammer
- Self-furring nails
- 15-lb. roofing felt or other waterproof backing paper
- Metal lath or wire mesh
- Metal stop beads Caulking gun and caulk
Application
1. QUIKRETE® Concrete Acrylic Fortifier can be added as part of the mix water to provide greater impact-resistance, strength, and durability. Use ½ gallon of QUIKRETE® Concrete Acrylic Fortifier for each 80-pound bag of FRS.
2. Mix to a smooth, butter-like consistency.
3. Apply the QUIKWALL® Fiberglass-Reinforced Stucco using a trowel. Work from the top to the bottom. Force the mix through the mesh so that it fills the ¼" gap between the mesh and waterproof paper completely.
4. Work to maintain an even 3/8" or slightly thicker coating. Texture the finish as the QUIKWALL® Fiberglass-Reinforced Stucco is applied.
5. QUIKWALL® Liquid Stucco may be trowel applied over QUIKWALL® FRS to provide a moisture resistant color and texture coating. QUIKWALL® Liquid Stucco is available in three textures - Swirl, Coarse Sanded and Fine Sanded. It can be pigmented to any desired color.
For Best Results
- Apply the brown coat and finish coat to an entire wall at a time to avoid coloration differences.
- While applying stucco, do not try to get tight joints around windows and doors. The caulk will take care of sealing the joints.
- Do not rake the scratch coat so hard that stucco is removed. Only rake hard enough to score the coat. A piece of lath or a wooden block with nails driven into it will also do a good job of raking.
- Do not apply stucco to a frozen surface or when freezing temperatures are likely.
|
